Update March 2020: Facebook & Instagram have introduced new API and older publically accessed API has been deprecated. This Blogger widget may not work & requires updates & helpers which may be beyond a Blogger user's reach & knowledge when in use. Apologies for any inconvenience.
Ever since June 2016 Instagram API updates, we found that a lot of Instagram widgets developed & made for Blogger platform (themes) becomes unusable. This is due to the changes at Instagram API which requires more security authentication to retrieve users Instagram posts/feed.
Luckily on BlogrCart Blogger themes, the Instagram widget pre-installed with this theme collection already provided easy solution/integration & currently working as expected.
After a year of testing, we thought that we could share this unique Blogger Instagram widget with users & it can be easily installed on any Blogger themes, including the new responsive theme collection Soho, Emporio, Notable and Contempo.
Before proceeding, lets take a look on this widget features:-
- Does not require external web services for subscriptions.
- Manage directly from your Blogger blog theme/widgets.
- No 3rd party plugins required.
- Easily add to blog with 1 click installer.
- Retrieve Instagram posts/images in various sorting display.
- Control amount of Instagram post display.
- Drag & drop placed widget anywhere in theme Layout
- No Javascript framework required.
- Extend Instagram image HTML output to your preference.
- Work on any layout -- fixed or responsive.
Below is a live example how the Instagram posts is retrieved using this awesome Blogger widget for any blog themes.
Version History
0-9-0 June 2017
- Initial widget release
- Install Blogger Instagram widget to your blog, (difficulty: easy)
- Create an Instagram client and retrieve personalized information. (step-by-step instruction included)
- Setting up & custom set Instagram posts display (difficulty: easy)
Step 1.0: Install Instagram Widget on Blogger Blogs.
By clicking the "Add Shopping Cart Order Form widget", you have read & agreed on the Terms of Service & Software Policy
- While sign in to Blogger, click "Add Instagram Widget to my Blog!" button above
- At Blogger Add Page Element, select your blog to install this widget
- Click Add Widget
- Preview your new widget which will be located at your Layout > Sidebar section.
- Click Edit to setup your plugins/extension settings. You may skip this as you can customize directly from your blog dashboard.
If you need to preview the widget contents you can click Edit Content.
1.1 Adding & Removing Widget
You can remove the widget anytime you like & re-install but do take note on the dependencies as stated/required below.
This widget is 100% safe & secured, no encryption -- read able codes & mark-ups.
1.2 Widget Placement
Use Layout drag & drop feature to place the widget accordingly.
Step 2.0: Get Your Instagram Client & Credentials.
This is required to retrieve:-
userIdclientIdaccessToken
Below is the easy step-by-step guide with screeen capture to retrieve all the above information from your new Instagram App Client.
You can skip this step if you already have a
userId, clientId and accessToken. For example Blogrcart blogger theme with shopping cart users can re-use their Instagram API credentials & add directly their custom setup in Step 3.Create & Register an Instagram Client
Go to https://www.instagram.com/developer/ and click
Log-In buttonUse your email/user name & password registered at Instagram to Log-in
Once logged-in head over to
Manage/Create ClientsClick
Register a new ClientFill in the Instagram client registration form, use screenshot as your guide.
Under the
Details tab:-- Application Name:
Enter your app name - Description:
Enter a brief description - Website:
Enter your blogger URL - OAuth_redirect_uri:
Enterhttp://instafeedjs.com
IMPORTANT: At
Security tab:-Uncheck the "Disable Implicit OAuth"
Now click the
Register button.Once successful, the details for your new registered Instagram client will display. Take note of your
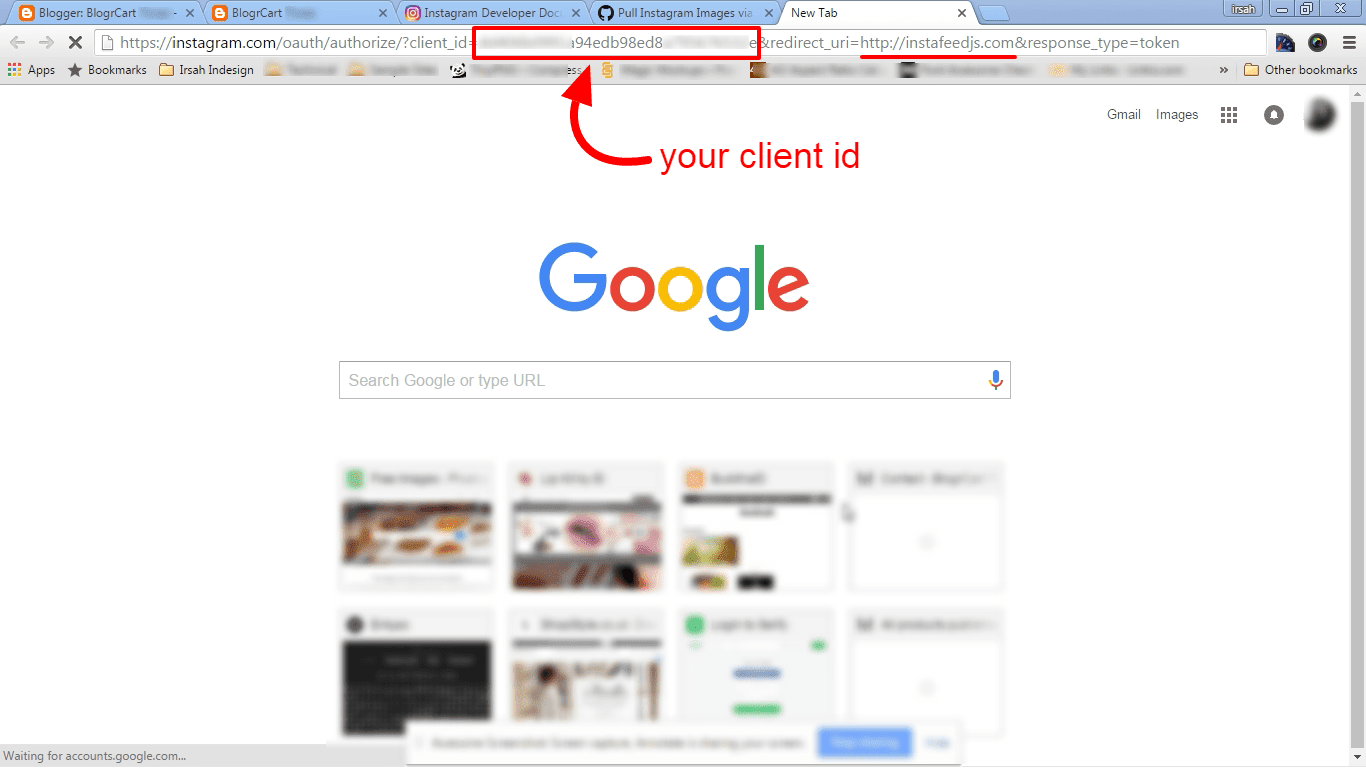
Client ID given.Open a new tab at your browser. Copy below URL & place it at the URL bar.
https://instagram.com/oauth/authorize/?client_id=[CLIENT_ID_HERE]&redirect_uri=http://instafeedjs.com&response_type=token
Replace highlighted yellow with your
Client ID provided at your Instagram dashboard (screenshot above). Once completed, press Enter.If the authentication goes well, you will be redirected to instafeedjs.com website to retrieve your
access_token & user_id to use with your Instagram widget.Copy the
user_id and the access_token for your reference. Keep it safe.Instagram Sandbox Environment
Upon registering a new Instagram client, users are provided with a
Sandbox API environment. This API environment only allows you to retrieve your own Instagram images from your account.Under Instagram
Sandbox mode, users are limited to 20 post images to retrieve & some other limitations explained at Instagram Developers page in detail.With all the information has been retrieved, you can continue to Step 3 below.
Step 3.0: Display Instagram Posts
Find the Instagram widget at your Blog Layout and Edit. The Instagram variables is made available for you to custom set.
<div id="instafeed">
</div>

<script>
  var INSTAGRAM = {
    instaFeed : 'https://cdn.staticaly.com/gh/stevenschobert/instafeed.js/e8c3a766/instafeed.min.js',
    get: 'user',
    userId : 'ADD-USER-ID',
    clientId: 'ADD-CLIENT-ID',
    accessToken : 'ADD-ACCESS-TOKEN',
    sortBy:'least-recent',
    limit: 10,
    resolution: 'thumbnail'
  };
</script>
General Specifications
<div id="instafeed">
</div>
This is the
<div/> element with a unique ID to append the retrieved images from Instagram (required)var INSTAGRAM = {
... {{ settings }}...
};
The object variable to pass to the Instagram plugin with the custom settings.
Important Variables to Replace
userId : 'ADD-USER-ID',Replace highlighted yellow with your Instagram userId retrieved in Step 2.
clientId: 'ADD-CLIENT-ID',Replace highlighted orange with your Instagram clientId retrieved in Step 2.
accessToken : 'ADD-ACCESS-TOKEN',Replace highlighted green with your Instagram accessToken retrieved in Step 2.
Variable Definitions for Setup
instaFeed : 'https://cdn.staticaly.com/gh/stevenschobert/instafeed.js/e8c3a766/instafeed.min.js',The javascript plugin library file URL to retrieve from Gihub by using a free reliable Content Delivery Network (CDN) service by staticaly.com.
sortBy : 'least-recent'How post images is arranged or sorted when retrieved from Instagram. Available values as follows.
most-recent- defaultleast-recentmost-likedleast-likedmost-commentedleast-commentedrandom
limit : 10The amount of posts to retrieve from Instagram. Max allowed 20.
resolution: 'thumbnail'The post image resolution to retrieve from Instagram. Available values are:-
thumbnail(150x150) - defaultlow_resolution(306x306)high_resolution(612x612)
References:
- instafeedjs - Dead simple plug-in to display Instagram at any website
- GitHub - Get Instagram Images via Javascript by Bradwestfall
- Instagram Developer website.
What do you think? Do you have any feedback or additional functions that needs to be included with this Instagram Blogger widget? Add your questions & comments below...


Got It!
Data submitted via comments collected & stored by the respective providers.
Read our Privacy Policy to learn more on data management & protection.