Update 18th July 2016
BlogrCart Mukabuku Elite, the replacement for BlogrCart Mukabuku blogger store template is now at version 2.0 - quicker page display, optimized, no code edits setup & minimized Blogger template installs. Makes it easy to run your online store in minutes!
Live & working theme preview still available & kicking. Read all this awesome theme enhancements & improvements introduced for version 2.0 here at http://blogrcart-mukabuku-elite.blogspot.com/p/theme-features.html
Update 31st October 2015
BlogrCart Mukabuku will be retiring & in replace BlogrCart Mukabuku Elite - more Facebook assets, more e-commerce features & more customization to play with. Pro users will receive a free full featured copy of Mukabuku Elite theme. View live preview for Mukabuku Elite at http://blogrcart-mukabuku-elite.blogspot.com/
BlogrCart Mukabuku will be retiring & in replace BlogrCart Mukabuku Elite - more Facebook assets, more e-commerce features & more customization to play with. Pro users will receive a free full featured copy of Mukabuku Elite theme. View live preview for Mukabuku Elite at http://blogrcart-mukabuku-elite.blogspot.com/
Original Article
Like it's name "mukabuku", which means Facebook in Malay language, this e-commerce blogger template was truly inspired by Facebook as a token of appreciation to our Fb fans & followers who have requested a Facebook-ish blogger store.

View Template Demo Compare Versions Download Now!
HTML5/CSS3 blogspot template, responsive design, Facebook inspired with pre-installed social plug-ins, with loads of featured surprises to convert your Blogger blog to an on-line e-commerce store/website in no time. The integration with Facebook Developer pre-installed plug-ins makes it easier for you to promote your product back to your Facebook fanpage. Full tutorials provided in template demo & also here at our blog.
Details of download versions for this template can viewed here, at the template download version page. [version 1.0]
This is a step by step guide to set-up & install BlogrCart MukaBuku Freemium Blogger template. Screenshot included as guidelines to ensure the relevant areas for personalized customizations. This is to make sure that the Blogger template functions work accordingly to fully utilize the shopping cart features.
Section 1
1.1 Create a Blog Account
Select "Simple" template from Blogger as the default template to install.
1.2 De-activate Mobile View
You can de-activate the default mobile view for your Blogger template in Template > Mobile > click settings Icon > select "No. Show desktop template on mobile devices." > click Save.1.3 Cleaning Up
Open template editor by clicking the Edit HTML button. Now find the widgets that was pre-installed with the default template and DELETE/REMOVE them (the codes). Use the Widget drop down menu to navigate to the widget codes. Details & screenshot can be viewed here to indicate where to remove the pre-installed widgets.1.4 Save Template & Ready for Upload
Click "Save Template" when completed removing unwanted blogspot widgets. Indicators for areas of removing is highlighted at the screenshot provided.Section 2
2.1 Blogger Template Files for Upload
For BlogrCart MukaBuku Fremium, users are equipped with 1 file to upload to their Blogger dashboard. Upon download, unzip that file and place it where it is recognizable in your computer.- 1 nos .xml file for the template install
- 1 nos .xml file for the pre-installed sample pages, tutorial page & customizing page which includes example product post.
- 1 nos .txt file for the ADVANCED Auto Product Post Template
- 1 nos .txt file with human readable code & tutorial references for Discount Code Add On
This really speeds up the installation as no copy & pasting of additional codes required to cut down the installation process duration.
Go to "Pages" > click the "Add Page" tab > type in Send Order (without quotes) as the page title. Click the HTML tab and copy below codes to the blogger editor body:-
Click "Save" and click "Publish".
Now view your Send Order page and grab the FULL URL at your browser bar. An example would look like so:-
2.3.2 Create Success Page (Ref: Success URL)
Go to "Pages" > click the "Add Page" tab > type in "Success" (without quotes) as the page title.
Insert an appropriate text body for the success page and click "Publish". Now view your Send Order page and grab the FULL URL at your browser bar. An example would look like so:-
2.3.3 Create Error Page (Ref: Error URL)
Go to "Pages" > click the "Add Page" tab > type in "Error" (without quotes) as the page title.
Insert an appropriate text body for the error page and click "Publish". Now view your Send Order page and grab the FULL URL at your browser bar. An example would look like so:-
IMPORTANT: The URL's are required for your send order email settings inside template codes.
These codes are required to automatically load your custom product page editing to ease on your product details. Keep in mind that all editing MUST be inside the provided square tables or the shopping cart will not grab your product informations.
Add a unique title and post your example product page.


An example of your reference Send Order URL would look like so as previously made in Section 2.3:-
Insert Ref:Send Order URL here:-
Since that your template files is still hosted on Bloggers main servers, the correct, the Send Order URL's must be using a blogspot.com URL in order to activate the email send order plug-in.
Taken for the Singapore country domain specific URL example above, now the correct URL to include at the above settings should display as follows:-
How to check your Ref:Send Order URL?


Now edit your Paypal preferences here. A registered email with Paypal is required.
Include your Ref:Success URL & Ref:Error URL where applies. The pages were made at Section 2.3 previously as your reference.
How to check/grab your Ref:Success URL?


Now customize your shipping selection here. Indicators provided for your reference.

Now customize your tax selection here. Indicators provided for your reference.


Edit the email currency at below codes:-

Edit the reference URL's to your created Blogger store pages at below codes. The below URL's reference was previously made at Section 2.2.
How to check/grab your Ref:Send Order URL?
How to check/grab your Ref:Success URL?
How to check/grab your Ref:Error URL?

Edit your Blogger store preferences at below codes:-

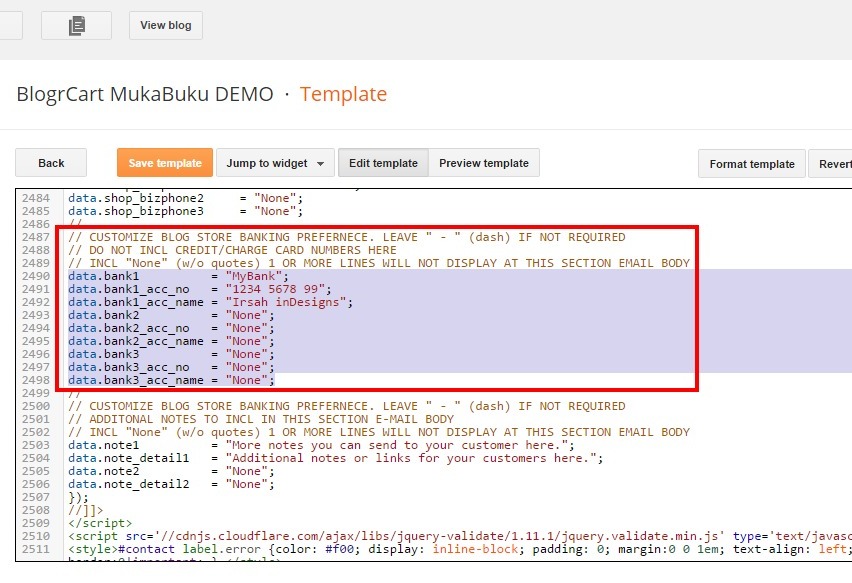
Edit Blogger store payment reference here, Important to not include any credit/debit/charge card numbers here.
Edit additional notes to include in your send order email here:-

IMPORTANT: All codes are required for the shopping cart plug-in. If areas is not required please leave empty (" ") or "None" or "-" at the respective codes where applicable.
Well, that's it! The shopping cart features should be working on your new Blogger template using the pre-installed shopping cart features, including the checkout page.
Coming up, the complete guide to customize this unique Blogger template with e-commerce features which would allow to to set/customize the looks and how the template operates as a whole.
You can take a glimpse on what is stored forBlogrCart Mukabuku PRO version here at the pre-made template page, which also comes with the Blogger template download files. A one click to install & run a Blogger e-commerce packed web store right from your fingertips in no time!
2.2 Install BlogCart MukaBuku Freemium Template Codes.
After downloading the file, unzip the files using your favourite program to your computer. In your Blogger dashboard > Template > Backup/Restore button > Upload template files.2.3 Create Pages
2.3.1 Create Send Order Page (Ref: Send Order URL)Go to "Pages" > click the "Add Page" tab > type in Send Order (without quotes) as the page title. Click the HTML tab and copy below codes to the blogger editor body:-
<h3 style="margin: 0;"> Order Details</h3> Review your orders.<br /> <br /> <span class="simpleCart_items"></span><br /> <hr /> <br /> <h3 style="margin: 0;"> Your Order Summary</h3> Below is your order summary & totals.<br /> <br /> <table border="1" class="summary" rules="all"><tbody> <tr> <td>Item quantity in cart:</td> <td><b><span class="simpleCart_quantity"> item(s)</span></b></td> </tr> <tr> <td>Amount in cart:</td> <td><b><span class="simpleCart_total"></span></b></td> </tr> <tr> <td>Shipping/Delivery Charges:</td> <td><b><span class="simpleCart_shipping"></span></b></td> </tr> <tr> <td>Tax:</td> <td><b><span class="simpleCart_tax"></span></b></td> </tr> <tr> <td><b>GRAND TOTAL:</b></td> <td><b><span class="simpleCart_grandTotal"></span></b></td> </tr> </tbody> </table> <br /> <hr /> <br /> <form action="" class="group" id="contact" method="post"> <fieldset> <h3 style="margin: 0;"> Send in Orders</h3> Details submitted here will not be published.<br /> <br /> <div> <label for="firstname">First Name</label> <input id="first_name" name="first_name" placeholder="Required" type="name" /> </div> <div> <label for="lastname">Last Name</label> <input id="last_name" name="last_name" placeholder="Required" type="name" /> </div> <div> <label for="email">Your E-mail</label> <input id="email" name="email" placeholder="Required" type="email" /> </div>< <div> <label for="phone">Phone @ H/P</label> <input id="phone" name="tel" placeholder="Required" type="number" /> </div> <div> <label for="address">Delivery Address</label> <textarea id="address" name="address" placeholder="Required"></textarea> </div> <div> <label for="postcode">Postal Code</label> <input id="postcode" name="postcode" placeholder="Required" type="text" /> </div> <div class="clear" style="width: 100%;"> </div> <div> <label for="message">Your Message<br /><small><i>Please include additional messages to us here.</i></small></label> <textarea id="comments" name="message" placeholder="Optional" style="border: 1px solid #ccc;"></textarea></div> <div> A copy of your order details will be sent to you via e-mail. Please check your inbox upon success submissions. Thank You. <br /> <br /> </div> <div> <a class="simpleCart_checkout button" href="javascript:;" id="sent-order">Send Order</a> </div> </fieldset> </form>
Click "Save" and click "Publish".
Now view your Send Order page and grab the FULL URL at your browser bar. An example would look like so:-
http://YOUR-BLOG-NAME.blogspot.com/p/send-order.html
2.3.2 Create Success Page (Ref: Success URL)
Go to "Pages" > click the "Add Page" tab > type in "Success" (without quotes) as the page title.
Insert an appropriate text body for the success page and click "Publish". Now view your Send Order page and grab the FULL URL at your browser bar. An example would look like so:-
http://YOUR-BLOG-NAME.blogspot.com/p/success.html
2.3.3 Create Error Page (Ref: Error URL)
Go to "Pages" > click the "Add Page" tab > type in "Error" (without quotes) as the page title.
Insert an appropriate text body for the error page and click "Publish". Now view your Send Order page and grab the FULL URL at your browser bar. An example would look like so:-
http://YOUR-BLOG-NAME.blogspot.com/p/error.html
IMPORTANT: The URL's are required for your send order email settings inside template codes.
2.4 Install Automated Product Post Template
Copy below codes & paste it at Settings > Post and Comments > Post Template > click the "Add" link.<table border="1" class="product-description" rules="all"><tbody> <tr><td class="item_description"> Lorem ipsum dolor sit amet, consectetur adipiscing elit. Morbi ligula eros, eleifend sit amet blandit quis, bibendum ac massa. Phasellus scelerisque turpis et quam varius tempor. Nulla eget turpis pellentesque, lobortis lectus id, consequat sapien. Donec blandit volutpat rhoncus. Donec ornare a metus nec fermentum.<br /> <br /> Cras faucibus nisi a interdum fermentum. Suspendisse blandit sed lacus scelerisque tincidunt. Vestibulum non mattis velit. Fusce non elit bibendum, viverra orci quis, dapibus nunc. Nulla facilisi. Duis hendrerit, sapien nec lobortis bibendum, dolor orci condimentum justo, suscipit ultricies sem tellus at dolor.<br /> .</td> </tr> </tbody></table> <table border="1" class="product-image" rules="all"><tbody> <tr> <td><div class="separator" style="clear: both; text-align: center;"> <a href="https://blogger.googleusercontent.com/img/b/R29vZ2xl/AVvXsEjAW3kYcmTnqPtTAEkMTJ5vVgzM5g5tQEIroWgjbmODHEITh8ptiVyvzeZybrrdH1OPOxTvz5dQYKO15a3wvmHDHu8a5YU7mDrHG1LRoNSmF6klLAnr1YxVT173zGzD4D-EU-QnltvaldxV/s1600/480x640.jpg" imageanchor="1" style="margin-left: 1em; margin-right: 1em;"><img alt="" border="0" src="https://blogger.googleusercontent.com/img/b/R29vZ2xl/AVvXsEjAW3kYcmTnqPtTAEkMTJ5vVgzM5g5tQEIroWgjbmODHEITh8ptiVyvzeZybrrdH1OPOxTvz5dQYKO15a3wvmHDHu8a5YU7mDrHG1LRoNSmF6klLAnr1YxVT173zGzD4D-EU-QnltvaldxV/s1600/480x640.jpg" height="320" title="new" width="240" /></a></div> </td> </tr> </tbody> </table> <table border="1" class="product-detail" rules="all"><tbody> <tr> <td class="item_price">$ 55.00 </td> </tr> </tbody></table> <!-- more --> <table border="1" class="product-thumbnail" rules="all"><tbody> <tr> <td class="thumb-images"><div class="separator" style="clear: both; text-align: center;"> <a href="https://blogger.googleusercontent.com/img/b/R29vZ2xl/AVvXsEjPDf_pI0dgeU48lSMGhYh2rgqry7Iy4qAIPLWXimSV8o5v0RYygjUnzXPCyVGxYfqPaU36ruunJg-458jcflhgEHMFh9MWzmR46UnqMjmIik1Mdviv2IorgRx78z2lzH8sBlJe4JV2PSQV/s1600/380x380.jpg" imageanchor="1" style="margin-left: 1em; margin-right: 1em;"><img border="0" src="https://blogger.googleusercontent.com/img/b/R29vZ2xl/AVvXsEjPDf_pI0dgeU48lSMGhYh2rgqry7Iy4qAIPLWXimSV8o5v0RYygjUnzXPCyVGxYfqPaU36ruunJg-458jcflhgEHMFh9MWzmR46UnqMjmIik1Mdviv2IorgRx78z2lzH8sBlJe4JV2PSQV/s1600/380x380.jpg" height="200" width="200" /></a></div> </td> <td class="thumb-images"><div class="separator" style="clear: both; text-align: center;"> <a href="https://blogger.googleusercontent.com/img/b/R29vZ2xl/AVvXsEjPDf_pI0dgeU48lSMGhYh2rgqry7Iy4qAIPLWXimSV8o5v0RYygjUnzXPCyVGxYfqPaU36ruunJg-458jcflhgEHMFh9MWzmR46UnqMjmIik1Mdviv2IorgRx78z2lzH8sBlJe4JV2PSQV/s1600/380x380.jpg" imageanchor="1" style="margin-left: 1em; margin-right: 1em;"><img border="0" src="https://blogger.googleusercontent.com/img/b/R29vZ2xl/AVvXsEjPDf_pI0dgeU48lSMGhYh2rgqry7Iy4qAIPLWXimSV8o5v0RYygjUnzXPCyVGxYfqPaU36ruunJg-458jcflhgEHMFh9MWzmR46UnqMjmIik1Mdviv2IorgRx78z2lzH8sBlJe4JV2PSQV/s1600/380x380.jpg" height="200" width="200" /></a></div> </td> <td class="thumb-images"><div class="separator" style="clear: both; text-align: center;"> <a href="https://blogger.googleusercontent.com/img/b/R29vZ2xl/AVvXsEjPDf_pI0dgeU48lSMGhYh2rgqry7Iy4qAIPLWXimSV8o5v0RYygjUnzXPCyVGxYfqPaU36ruunJg-458jcflhgEHMFh9MWzmR46UnqMjmIik1Mdviv2IorgRx78z2lzH8sBlJe4JV2PSQV/s1600/380x380.jpg" imageanchor="1" style="margin-left: 1em; margin-right: 1em;"><img border="0" src="https://blogger.googleusercontent.com/img/b/R29vZ2xl/AVvXsEjPDf_pI0dgeU48lSMGhYh2rgqry7Iy4qAIPLWXimSV8o5v0RYygjUnzXPCyVGxYfqPaU36ruunJg-458jcflhgEHMFh9MWzmR46UnqMjmIik1Mdviv2IorgRx78z2lzH8sBlJe4JV2PSQV/s1600/380x380.jpg" height="200" width="200" /></a></div> </td> <td class="thumb-images"><div class="separator" style="clear: both; text-align: center;"> <a href="https://blogger.googleusercontent.com/img/b/R29vZ2xl/AVvXsEjPDf_pI0dgeU48lSMGhYh2rgqry7Iy4qAIPLWXimSV8o5v0RYygjUnzXPCyVGxYfqPaU36ruunJg-458jcflhgEHMFh9MWzmR46UnqMjmIik1Mdviv2IorgRx78z2lzH8sBlJe4JV2PSQV/s1600/380x380.jpg" imageanchor="1" style="margin-left: 1em; margin-right: 1em;"><img border="0" src="https://blogger.googleusercontent.com/img/b/R29vZ2xl/AVvXsEjPDf_pI0dgeU48lSMGhYh2rgqry7Iy4qAIPLWXimSV8o5v0RYygjUnzXPCyVGxYfqPaU36ruunJg-458jcflhgEHMFh9MWzmR46UnqMjmIik1Mdviv2IorgRx78z2lzH8sBlJe4JV2PSQV/s1600/380x380.jpg" height="200" width="200" /></a></div> </td> <td class="thumb-images"><div class="separator" style="clear: both; text-align: center;"> <a href="https://blogger.googleusercontent.com/img/b/R29vZ2xl/AVvXsEjPDf_pI0dgeU48lSMGhYh2rgqry7Iy4qAIPLWXimSV8o5v0RYygjUnzXPCyVGxYfqPaU36ruunJg-458jcflhgEHMFh9MWzmR46UnqMjmIik1Mdviv2IorgRx78z2lzH8sBlJe4JV2PSQV/s1600/380x380.jpg" imageanchor="1" style="margin-left: 1em; margin-right: 1em;"><img border="0" src="https://blogger.googleusercontent.com/img/b/R29vZ2xl/AVvXsEjPDf_pI0dgeU48lSMGhYh2rgqry7Iy4qAIPLWXimSV8o5v0RYygjUnzXPCyVGxYfqPaU36ruunJg-458jcflhgEHMFh9MWzmR46UnqMjmIik1Mdviv2IorgRx78z2lzH8sBlJe4JV2PSQV/s1600/380x380.jpg" height="200" width="200" /></a></div> </td> <td class="thumb-images"><div class="separator" style="clear: both; text-align: center;"> <a href="https://blogger.googleusercontent.com/img/b/R29vZ2xl/AVvXsEjPDf_pI0dgeU48lSMGhYh2rgqry7Iy4qAIPLWXimSV8o5v0RYygjUnzXPCyVGxYfqPaU36ruunJg-458jcflhgEHMFh9MWzmR46UnqMjmIik1Mdviv2IorgRx78z2lzH8sBlJe4JV2PSQV/s1600/380x380.jpg" imageanchor="1" style="margin-left: 1em; margin-right: 1em;"><img border="0" src="https://blogger.googleusercontent.com/img/b/R29vZ2xl/AVvXsEjPDf_pI0dgeU48lSMGhYh2rgqry7Iy4qAIPLWXimSV8o5v0RYygjUnzXPCyVGxYfqPaU36ruunJg-458jcflhgEHMFh9MWzmR46UnqMjmIik1Mdviv2IorgRx78z2lzH8sBlJe4JV2PSQV/s1600/380x380.jpg" height="200" width="200" /></a></div> </td> </tr> </tbody> </table>
These codes are required to automatically load your custom product page editing to ease on your product details. Keep in mind that all editing MUST be inside the provided square tables or the shopping cart will not grab your product informations.
Add a unique title and post your example product page.
2.5 Disable Blogger Built In Image Lightbox
You can also DISABLE Blogger pre-installed light box at screenshot below. BlogrCart Mukabuku comes pre-installed with a lightweight responsive image pop up plug-in which have been optimised for your product views.Section 3 (Shopping Cart Settings)
3.1 Shopping Cart Plug-in Settings
Hover to your Blogger widgets drop down and select HTML99 to navigate to the widget codes:-3.2 Insert Ref: Send Order URL
Expand <b:includable id='main'> by clicking the black triangle.An example of your reference Send Order URL would look like so as previously made in Section 2.3:-
http://YOUR-BLOG-NAME.blogspot.com/p/send-order.html
Insert Ref:Send Order URL here:-
Quick note.
We have received reports from users that using Blogger domain to country specific URL's will not work properly. Examples for local country domain specific URL's are like so:-- http://YOUR-BLOG-NAME.blogspot.id - Blogger hosted server for Indian users
- http://YOUR-BLOG-NAME.blogspot.sg - Blogger hosted server for Singapore users.
- http://YOUR-BLOG-NAME.blogspot.au - Blogger hosted server for Autralian users.
- http://YOUR-BLOG-NAME.blogspot.mx - Blogger hosted server for Mexican users.
- http://YOUR-BLOG-NAME.blogspot.jp - Blogger hosted server for Japan users.
- http://YOUR-BLOG-NAME.blogspot.it - Blogger hosted server for China users.
- http://YOUR-BLOG-NAME.blogspot.vn - Blogger hosted server for Vietnamese users.
Since that your template files is still hosted on Bloggers main servers, the correct, the Send Order URL's must be using a blogspot.com URL in order to activate the email send order plug-in.
Taken for the Singapore country domain specific URL example above, now the correct URL to include at the above settings should display as follows:-
- http://YOUR-BLOG-NAME.blogspot.com - Blogger hosted server for Singapore users.
How to check your Ref:Send Order URL?
- Go to Pages > Hover to the "Send Order" link > click the "View" link to go to the "Send Order" page.
- At your browser, grab the URL at the browser bar.
3.3 Customize Shopping Cart Currency
Expand <b:includable id='cart-currency-settings'> by clicking the black triangle.3.4 Customize Shopping Cart Paypal Checkout Settings
Expand <b:includable id='cart-paypal'> by clicking the black triangle.Now edit your Paypal preferences here. A registered email with Paypal is required.
Include your Ref:Success URL & Ref:Error URL where applies. The pages were made at Section 2.3 previously as your reference.
How to check/grab your Ref:Success URL?
- Go to Pages > Hover to the "Success" link > click the "View" link to go to the "Success" page.
- At your browser, grab the URL at the browser bar.
- Go to Pages > Hover to the "Error" link > click the "View" link to go to the "Error" page.
- At your browser, grab the URL at the browser bar.
3.5 Customize Shopping Cart Shipping Settings
Expand <b:includable id='cart-shipping-settings'> by clicking the black triangle.Now customize your shipping selection here. Indicators provided for your reference.
3.6 Customize Shopping Cart Tax Settings
Expand <b:includable id='cart-tax-settings'> by clicking the black triangle.Now customize your tax selection here. Indicators provided for your reference.
3.7 Customize Shopping Cart Send Order Email Settings
Expand <b:includable id='cart-email'> by clicking the black triangle.Edit the email currency at below codes:-
Edit the reference URL's to your created Blogger store pages at below codes. The below URL's reference was previously made at Section 2.2.
- Ref: Send Order URL ( ie: http://YOUR-BLOG-NAME.blogspot.com/p/send-order.html )
- Ref: Success URL ( ie: http://YOUR-BLOG-NAME.blogspot.com/p/success.html )
- Ref: Error URL ( ie: http://YOUR-BLOG-NAME.blogspot.com/p/error.html )
- Go to Pages > Hover to the "Send Order" link > click the "View" link to go to the "Send Order" page.
- At your browser, grab the URL at the browser bar.
How to check/grab your Ref:Success URL?
- Go to Pages > Hover to the "Success" link > click the "View" link to go to the "Success" page.
- At your browser, grab the URL at the browser bar.
How to check/grab your Ref:Error URL?
- Go to Pages > Hover to the "Error" link > click the "View" link to go to the "Error" page.
- At your browser, grab the URL at the browser bar.
Edit Blogger store payment reference here, Important to not include any credit/debit/charge card numbers here.
Edit additional notes to include in your send order email here:-
IMPORTANT: All codes are required for the shopping cart plug-in. If areas is not required please leave empty (" ") or "None" or "-" at the respective codes where applicable.
Well, that's it! The shopping cart features should be working on your new Blogger template using the pre-installed shopping cart features, including the checkout page.
Coming up, the complete guide to customize this unique Blogger template with e-commerce features which would allow to to set/customize the looks and how the template operates as a whole.
You can take a glimpse on what is stored for
Got It!
Data submitted via comments collected & stored by the respective providers.
Read our Privacy Policy to learn more on data management & protection.