Update 26 July 2016 - Now BlogrCart BUTIK Blogger shopping cart theme/template in version 2.0, more powerful & less setups to quickly build your online store without any CODE EDITS. View the new collection here http://blog.irsah.com/gallery. Easier installs, no programming required!
Original Article published 26 August 2014
BlogrCart Butik PRO & FREE responsive blogger (blogspot) pre-made e-commerce template with shopping cart functions have been so successful, we from Irsah inDesigns thought that it would be a great idea to provide the full installation guide/tutorial here at our blog.

Customising BlogrCart Butik v1.0 e-commerce Blogger template is made easier with this how to's and guide. It is important that the initial set-up is successful before going on to the blogger pre-made template custom features.
Instructions here includes editing & customizing mobile navigation links, insert image slider, click to action buttons, subscribe buttons via Google feed burner and more.
Among the special features pre-installed in this blogger + e-commerce HTML5/CSS3 blogspot template is as follows:-
This full blogger + ecommerce template installation page covers (with illustrations) :-
For PRO versions, the downloaded files included are as follows:-
In Template > Backup /Restore > Find BlogrCart Butik .xml file in your computer > Upload the file content.
Click "Save & Publish Settings" and check if successfully installed by posting a new post by clicking the "pencil" icon.

The send order form codes:-
The send order page should look like below

Update September 2014
Once done, click "Save & Publish" and view this page to grab the URL from your browser bar. an example should look like below (Ref: Send Order URL):-


Insert the URL to you send order page (REF: Send Order URL) at below

Insert Ref:Send Order URL here:-
Since that your template files is still hosted on Bloggers main servers, the correct Send Order URL's must be using a blogspot.com URL in order to activate the email send order plug-in which comes pre-installed.
Taken from the Singapore Blogger country domain specific URL example above, now the correct URL to include for the above settings should display as follows:-


Edit the email currency at below codes:-

Edit the reference URL's to your created Blogger store pages at below codes:-

Edit Blogger store credentials at below codes:-

Edit Blogger store payment reference here, Importaat to not include any credit/debit/charge card numbers here.

Edit additional notes to include in your send order email here:-

IMPORTANT
All codes are required for the shopping cart plug-in. If areas is not required please leave empty (" ") or "None" or "-" at the respective codes where applicable.


Replace " /p/send-order.html " with your created Ref: Send Order URL page.
Include your uploaded image URL at below highlighted codes:-
Example image click to action button ( URL's & text) as follows:-

Edit the Click to Action heading title and paragraphs at below codes:-
Insert your click to action uploaded image at below codes. Preferred image ia 900pixels in width and 600pixels in height at 4:3 image ratio. Each image file size must be below 150kb.

Edit the click to action URL at below codes.
Here is an example of the click to action format to include the URL link.

Each Homepage Info section starts at <article> and ends with </article>
Edit the Info Section headings per <article> here:-

Edit the Info Section paragraphs per <article> here:-

Edit at the highlighted code or change the URL's to your social profile page.
We have also simplified the codes given by Google feed burner so users can easily include the required Feed burner account name in the codes itself. Below is the example codes:-
Include your blog feed name registered at Feedburner at the code here " YOUR-FEED-NAME "

Insert your preferred URL at highlighted codes above.
Example of the footer links would look like so:-
Select an image (preferable 1600pixels X 250pixels at below 100kb in image file size) > choose "Instead as Title and Description" > click Save to upload the Header image.
A - Please check that your Send Order page URL matches the ones in Step 5: "Drop Down View Cart Buttons & Url's".
Q - Hey! When I tried to click the send order button, It's diverts to Paypal. Why?
A - By default the shopping cart is workable and functional via the pre-sets included upon template install. Normally there can be 2 instances which could cause the errors:-
Q - Owh! Now when I click the Send Order at my checkout form button it goes to a Page Not Found. Why?
A - One or more settings in your "cart-email" did not follow the initial format provided. Normally the " http:// " protocol is included in the URL at your blog address, success page & error page. Remove the " http:// " and it will be working again.
Q - Why don't you guys build a Blogger widget for this template?
A - Good question! But we want you to familiarize with the codes & the shopping cart plug-in for Blogger templates. The plug-in itself is so versatile & by including simple line of codes, the plug-in can do what e-commerce store do! We want you to take full control on what can be displayed or not at your Blogger store via your own customizations. This way you are in full control, not dependable on an e-commerce shopping cart plug-in/widget. You can easily adapt/incorporate the functionality at your own Blogger template designed/builds too!
BlogrCart Butik PRO & FREE responsive blogger (blogspot) pre-made e-commerce template with shopping cart functions have been so successful, we from Irsah inDesigns thought that it would be a great idea to provide the full installation guide/tutorial here at our blog.
The tutorial below is not used for BlogrCart BUTIK Blogger store theme for version 2.0 onwards. This article is kept for theme reference only.

(FREE download scroll down to bottom of above linked page)
Customising BlogrCart Butik v1.0 e-commerce Blogger template is made easier with this how to's and guide. It is important that the initial set-up is successful before going on to the blogger pre-made template custom features.
Instructions here includes editing & customizing mobile navigation links, insert image slider, click to action buttons, subscribe buttons via Google feed burner and more.
Among the special features pre-installed in this blogger + e-commerce HTML5/CSS3 blogspot template is as follows:-
- Responsive HTML5/CSS3 Blogger template
- Responsive drop down main menu navigations
- Responsive homepage image slider with click to action buttons
- Optimised homepage display.
- Paypal checkout pre-installed.
- Unlimited send order e-mail with custom send order HTML5 form.
- Success and Error handling pages.
- Built-in product search bar
- Drop down view cart.
- Custom product post display.
- Auto product post template for easy editing.
- Available mode of payment icon pre-installed.
- Social icons ready.
- Subscribe via email powered by Google's owned Feedburner.
- Customize Labels and Footer links display.
- Detail tutorial & step-by-step installation guide with illustrations included.
- Clean codes & mark-up.
- No hidden & encrypted codes.
This full blogger + ecommerce template installation page covers (with illustrations) :-
- Download & extract the custom pre-made blogger template codes.
- Installing the Blogger template
- Installing the shopping cart functions & customizing it.
- Customizing the template features.
- Copy & paste HTML codes provide.
Important Blogger Theme Update - April 14 2016!
To allow the Theme Plug-ins gadget to register itself with your new theme setup, users are required to activate the

To allow the Theme Plug-ins gadget to register itself with your new theme setup, users are required to activate the
HTML/Javascript gadget with the title Plugin or DoNotRemove Cart Plugins or Plug-ins Cart located at the bottom of theme Layout. Click Edit the said gadget & add some content to save it. View screenshot below for reference.
Tutorial Install BlogrCart Butik v1.0 Freemium Blogger Ecommerce Pre-made Template
Download Blogger Template File
The file for download is a compressed .zip file. Download the files at link provided and extract the file to a recognise location in your computer.For PRO versions, the downloaded files included are as follows:-
- Full template .xml file
- Sample product pages, tutorial page and template customization page.
- Advance Auto Post Template codes with drop down select product included.
- readme.txt file which includes license & permissions.
Install Blogger Template
Create a new Blog > Get a suitable URL for the blog > Name the Blog > Select "Simple" template as default template > Click "Create Blog"In Template > Backup /Restore > Find BlogrCart Butik .xml file in your computer > Upload the file content.
Shopping Cart Installation & Customizations
Install Custom Product Post Template
Settings > Post and Comments > Post Template > "add" link > copy & paste codes below in editor body:-<table border="1" class="product-description"> <tbody> <tr> <td class="item_description">Lorem ipsum dolor sit amet, consectetur adipiscing elit. Morbi ligula eros, eleifend sit amet blandit quis, bibendum ac massa. Phasellus scelerisque turpis et quam varius tempor. Nulla eget turpis pellentesque, lobortis lectus id, consequat sapien. Donec blandit volutpat rhoncus. Donec ornare a metus nec fermentum. Curabitur aliquet odio at ante ullamcorper sollicitudin. Phasellus sem nisl, porttitor sit amet varius porta, vulputate id ante. Duis at eros lectus. Pellentesque non convallis sem. </td> </tr> </tbody> </table> <table border="1" class="product-image"><tbody> <tr> <th class="thumb_image"><div class="separator" style="clear: both; text-align: center;"> <a href="https://blogger.googleusercontent.com/img/b/R29vZ2xl/AVvXsEjAW3kYcmTnqPtTAEkMTJ5vVgzM5g5tQEIroWgjbmODHEITh8ptiVyvzeZybrrdH1OPOxTvz5dQYKO15a3wvmHDHu8a5YU7mDrHG1LRoNSmF6klLAnr1YxVT173zGzD4D-EU-QnltvaldxV/s1600/480x640.jpg" imageanchor="1" style="margin-left: 1em; margin-right: 1em;"><img border="0" src="https://blogger.googleusercontent.com/img/b/R29vZ2xl/AVvXsEjAW3kYcmTnqPtTAEkMTJ5vVgzM5g5tQEIroWgjbmODHEITh8ptiVyvzeZybrrdH1OPOxTvz5dQYKO15a3wvmHDHu8a5YU7mDrHG1LRoNSmF6klLAnr1YxVT173zGzD4D-EU-QnltvaldxV/s1600/480x640.jpg" height="320" width="240" /></a></div> </th> </tr> </tbody> </table> <table border="1" class="product-detail"> <tbody> <tr><td class="item_price">RM 15.00</td></tr> </tbody> </table> <!--more--><table border="1" class="product-thumbnail"> <tbody> <tr> <td class="thumb-images"><div class="separator" style="clear: both; text-align: center;"> <a href="https://blogger.googleusercontent.com/img/b/R29vZ2xl/AVvXsEjPDf_pI0dgeU48lSMGhYh2rgqry7Iy4qAIPLWXimSV8o5v0RYygjUnzXPCyVGxYfqPaU36ruunJg-458jcflhgEHMFh9MWzmR46UnqMjmIik1Mdviv2IorgRx78z2lzH8sBlJe4JV2PSQV/s1600/380x380.jpg" imageanchor="1" style="margin-left: 1em; margin-right: 1em;"><img border="0" src="https://blogger.googleusercontent.com/img/b/R29vZ2xl/AVvXsEjPDf_pI0dgeU48lSMGhYh2rgqry7Iy4qAIPLWXimSV8o5v0RYygjUnzXPCyVGxYfqPaU36ruunJg-458jcflhgEHMFh9MWzmR46UnqMjmIik1Mdviv2IorgRx78z2lzH8sBlJe4JV2PSQV/s1600/380x380.jpg" height="200" width="200" /></a></div> </td> <td class="thumb-images"><div class="separator" style="clear: both; text-align: center;"> <a href="https://blogger.googleusercontent.com/img/b/R29vZ2xl/AVvXsEjPDf_pI0dgeU48lSMGhYh2rgqry7Iy4qAIPLWXimSV8o5v0RYygjUnzXPCyVGxYfqPaU36ruunJg-458jcflhgEHMFh9MWzmR46UnqMjmIik1Mdviv2IorgRx78z2lzH8sBlJe4JV2PSQV/s1600/380x380.jpg" imageanchor="1" style="margin-left: 1em; margin-right: 1em;"><img border="0" src="https://blogger.googleusercontent.com/img/b/R29vZ2xl/AVvXsEjPDf_pI0dgeU48lSMGhYh2rgqry7Iy4qAIPLWXimSV8o5v0RYygjUnzXPCyVGxYfqPaU36ruunJg-458jcflhgEHMFh9MWzmR46UnqMjmIik1Mdviv2IorgRx78z2lzH8sBlJe4JV2PSQV/s1600/380x380.jpg" height="200" width="200" /></a></div> </td> <td class="thumb-images"><div class="separator" style="clear: both; text-align: center;"> <a href="https://blogger.googleusercontent.com/img/b/R29vZ2xl/AVvXsEjPDf_pI0dgeU48lSMGhYh2rgqry7Iy4qAIPLWXimSV8o5v0RYygjUnzXPCyVGxYfqPaU36ruunJg-458jcflhgEHMFh9MWzmR46UnqMjmIik1Mdviv2IorgRx78z2lzH8sBlJe4JV2PSQV/s1600/380x380.jpg" imageanchor="1" style="margin-left: 1em; margin-right: 1em;"><img border="0" src="https://blogger.googleusercontent.com/img/b/R29vZ2xl/AVvXsEjPDf_pI0dgeU48lSMGhYh2rgqry7Iy4qAIPLWXimSV8o5v0RYygjUnzXPCyVGxYfqPaU36ruunJg-458jcflhgEHMFh9MWzmR46UnqMjmIik1Mdviv2IorgRx78z2lzH8sBlJe4JV2PSQV/s1600/380x380.jpg" height="200" width="200" /></a></div> </td> <td class="thumb-images"><div class="separator" style="clear: both; text-align: center;"> <a href="https://blogger.googleusercontent.com/img/b/R29vZ2xl/AVvXsEjPDf_pI0dgeU48lSMGhYh2rgqry7Iy4qAIPLWXimSV8o5v0RYygjUnzXPCyVGxYfqPaU36ruunJg-458jcflhgEHMFh9MWzmR46UnqMjmIik1Mdviv2IorgRx78z2lzH8sBlJe4JV2PSQV/s1600/380x380.jpg" imageanchor="1" style="margin-left: 1em; margin-right: 1em;"><img border="0" src="https://blogger.googleusercontent.com/img/b/R29vZ2xl/AVvXsEjPDf_pI0dgeU48lSMGhYh2rgqry7Iy4qAIPLWXimSV8o5v0RYygjUnzXPCyVGxYfqPaU36ruunJg-458jcflhgEHMFh9MWzmR46UnqMjmIik1Mdviv2IorgRx78z2lzH8sBlJe4JV2PSQV/s1600/380x380.jpg" height="200" width="200" /></a></div> </td> <td class="thumb-images"><div class="separator" style="clear: both; text-align: center;"> <a href="https://blogger.googleusercontent.com/img/b/R29vZ2xl/AVvXsEjPDf_pI0dgeU48lSMGhYh2rgqry7Iy4qAIPLWXimSV8o5v0RYygjUnzXPCyVGxYfqPaU36ruunJg-458jcflhgEHMFh9MWzmR46UnqMjmIik1Mdviv2IorgRx78z2lzH8sBlJe4JV2PSQV/s1600/380x380.jpg" imageanchor="1" style="margin-left: 1em; margin-right: 1em;"><img border="0" src="https://blogger.googleusercontent.com/img/b/R29vZ2xl/AVvXsEjPDf_pI0dgeU48lSMGhYh2rgqry7Iy4qAIPLWXimSV8o5v0RYygjUnzXPCyVGxYfqPaU36ruunJg-458jcflhgEHMFh9MWzmR46UnqMjmIik1Mdviv2IorgRx78z2lzH8sBlJe4JV2PSQV/s1600/380x380.jpg" height="200" width="200" /></a></div> </td> <td class="thumb-images"><div class="separator" style="clear: both; text-align: center;"> <a href="https://blogger.googleusercontent.com/img/b/R29vZ2xl/AVvXsEjPDf_pI0dgeU48lSMGhYh2rgqry7Iy4qAIPLWXimSV8o5v0RYygjUnzXPCyVGxYfqPaU36ruunJg-458jcflhgEHMFh9MWzmR46UnqMjmIik1Mdviv2IorgRx78z2lzH8sBlJe4JV2PSQV/s1600/380x380.jpg" imageanchor="1" style="margin-left: 1em; margin-right: 1em;"><img border="0" src="https://blogger.googleusercontent.com/img/b/R29vZ2xl/AVvXsEjPDf_pI0dgeU48lSMGhYh2rgqry7Iy4qAIPLWXimSV8o5v0RYygjUnzXPCyVGxYfqPaU36ruunJg-458jcflhgEHMFh9MWzmR46UnqMjmIik1Mdviv2IorgRx78z2lzH8sBlJe4JV2PSQV/s1600/380x380.jpg" height="200" width="200" /></a></div> </td> </tr> </tbody> </table>
Click "Save & Publish Settings" and check if successfully installed by posting a new post by clicking the "pencil" icon.
Create Send Order Page (Ref: Send Order URL)
Pages > Add Page > key in "Send Order" as Page Title > copy & paste below codes in the HTML Blogger editor body:-The send order form codes:-
<h3 style="margin: 0;"> Order Details</h3> Review your orders.<br /> <br /> <span class="simpleCart_items"></span><br /> <hr /> <br /> <h3 style="margin: 0;"> Your Order Summary</h3> Below is your order summary & totals.<br /> <br /> <table border="1" class="summary" rules="all"> <tbody> <tr> <td>Item quantity in cart:</td> <td><b><span class="simpleCart_quantity"> item(s)</span></b></td></tr> <tr> <td>Amount in cart:</td> <td><b><span class="simpleCart_total"></span></b></td> </tr> <tr> <td>Shipping/Delivery Charges:</td> <td><b><span class="simpleCart_shipping"></span></b></td></tr> <tr> <td>Tax:</td> <td><b><span class="simpleCart_tax"></span></b></td></tr> <tr> <td><b>GRAND TOTAL:</b></td> <td><b><span class="simpleCart_grandTotal"></span></b></td> </tr> </tbody> </table> <br /> <hr /> <br /> <form action="" id="contact" method="post"> <fieldset> <h3 style="margin: 0;"> Send in Orders</h3> Details submitted here will not be published.<br /> <br /> <div> <label for="firstname">First Name</label> <input id="first_name" name="first_name" placeholder="Required" type="name" /></div> <div> <label for="lastname">Last Name</label> <input id="last_name" name="last_name" placeholder="Required" type="name" /></div> <div> <label for="email">Your E-mail</label> <input id="email" name="email" placeholder="Required" type="email" /></div> <div> <label for="phone">Phone @ H/P</label> <input id="phone" name="tel" placeholder="Required" type="number" /></div> <div> <label for="address">Delivery Address</label> <textarea id="address" name="address" placeholder="Required"></textarea></div> <div> <label for="postcode">Postal Code</label> <input id="postcode" name="postcode" placeholder="Required" type="text" /></div> <div class="clear" style="width: 100%;"> </div> <div> <label for="message">Your Message<br /><small><i>Please include additional messages to us here.</i></small></label> <textarea id="comments" name="message" placeholder="Optional" style="border: 1px solid #ccc;"></textarea></div> <div> A copy of your order details will be sent to you via e-mail. Please check your inbox upon success submissions. Thank You. <br /> <br /></div> <div> <a class="simpleCart_checkout button" href="javascript:;" id="sent-order">Send Order</a></div> </fieldset> </form>
The send order page should look like below
Update September 2014
We have received reports from users that's using Blogger domain to country specific URL's will not work properly for the Send Order page., using Blogger country to domain specific URL's. An example would be like so http://YOUR-BLOG-NAME.blogspot.id (fir Indian Blogger users etc).
Change the URL to the Blogger .com extension where applies.
YOUR-BLOG-STORE-NAME.blogspot.com/p/send-order.html
Create Success Page (Ref: Success URL)
Pages > Add Page > key in "Success" as Page Title > edit page to desire > click "Save & Publish" > view this page to grab the URL from your browser bar. an example should look like below (Ref: Success URL)YOUR-BLOG-STORE-NAME.blogspot.com/p/success.html
Create Error Page (Ref: Error URL)
Pages > Add Page > key in "Success" as Page Title > edit page to desire > click "Save & Publish" > view this page to grab the URL from your browser bar. an example should look like below (Ref: Success URL)YOUR-BLOG-STORE-NAME.blogspot.com/p/error.html
Drop Down View Cart Buttons & Urls
Find below codes to edit the drop down view cart send order page URL.Insert the URL to you send order page (REF: Send Order URL) at below
<a class='button' href='YOUR-BLOG-STORE.blogspot.com/p/send-order.html>Send Order</a>
Shopping Cart Plug-in Settings
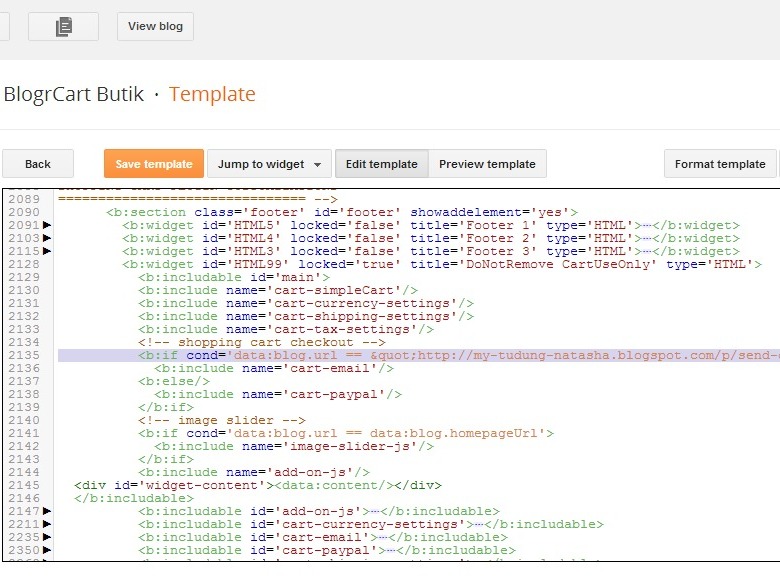
Hover to your Blogger widgets drop down and select HTML99 to navigate to the widget codes:-Insert Ref: Send Order URL
Expand <b:includable id='main'> by clicking the black triangle.Insert Ref:Send Order URL here:-
Quick note.
We have received reports from users that using Blogger domain to country specific URL's will not work properly. Examples for local country domain specific URL's are like so:-- http://YOUR-BLOG-NAME.blogspot.id - Blogger hosted server for Indian users
- http://YOUR-BLOG-NAME.blogspot.sg - Blogger hosted server for Singapore users.
- http://YOUR-BLOG-NAME.blogspot.au - Blogger hosted server for Autralian users.
- http://YOUR-BLOG-NAME.blogspot.mx - Blogger hosted server for Mexican users.
- http://YOUR-BLOG-NAME.blogspot.jp - Blogger hosted server for Japan users.
- http://YOUR-BLOG-NAME.blogspot.it - Blogger hosted server for China users.
- http://YOUR-BLOG-NAME.blogspot.vn - Blogger hosted server for Vietnamese users.
Since that your template files is still hosted on Bloggers main servers, the correct Send Order URL's must be using a blogspot.com URL in order to activate the email send order plug-in which comes pre-installed.
Taken from the Singapore Blogger country domain specific URL example above, now the correct URL to include for the above settings should display as follows:-
- http://YOUR-BLOG-NAME.blogspot.com - Blogger hosted server for Singapore users.
Customize Shopping Cart Currency
Expand <b:includable id='cart-currency-settings'> by clicking the black triangle.Customize Shopping Cart Paypal Settings
Expand <b:includeable id='cart-paypal'> by clicking the black triangle.Customize Shopping Cart Shipping Settings
Expand <b:includable id='cart-shipping-settings'> by clicking the black triangle.Customize Shopping Cart Tax Settings
Expand <b:includable id='cart-tax-settings'> by clicking the black triangle.Customize Shopping Cart Send Order Email Settings
Expand <b:includable id='cart-email'> by clicking the black triangle.Edit the email currency at below codes:-
Edit the reference URL's to your created Blogger store pages at below codes:-
- Ref: Send Order URL
- Ref: Success URL
- Ref: Error URL
Edit Blogger store credentials at below codes:-
Edit Blogger store payment reference here, Importaat to not include any credit/debit/charge card numbers here.
Edit additional notes to include in your send order email here:-
IMPORTANT
All codes are required for the shopping cart plug-in. If areas is not required please leave empty (" ") or "None" or "-" at the respective codes where applicable.
Customizing BlogrCart Butik Template
Main Navigation Drop Down Editing
Find below codes to edit the main navigation drop down links. An example format is given in template codes. First 2 links not required as it has already been preset to display your gallery page.
To edit a drop down link section edit at below areas:-

Sticky Social Icons
Edit the URL to your social profile page for the social icons located at the sticky header section.

Customize View Cart Drop Down Link
In template editor find codes below:-<!-- CHECKOUT BUTTONS -->
Slightly below, you will find these codes:-
<a class='send-order button' href='/p/send-order.html'>Send Order</a>
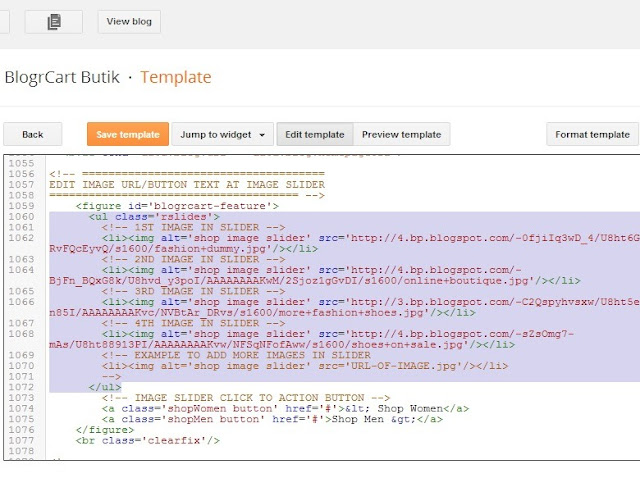
Homepage Responsive Image Slider Editing
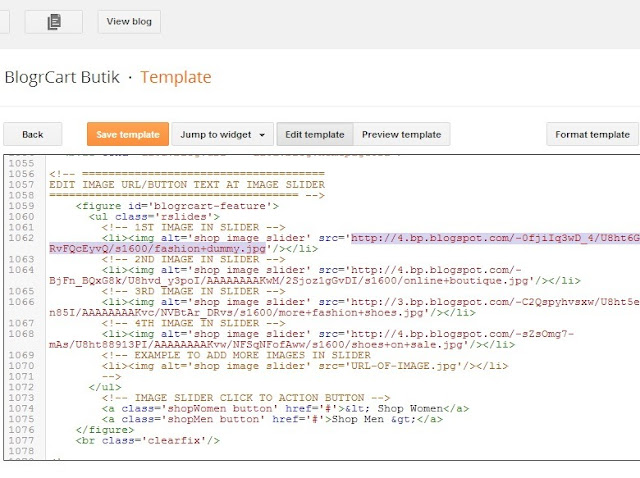
Insert your desired slider images at the given codes below. Upload an image with ideal size of 1200pixels width & 960pixels in width at 4:3 image ratio. Each image file size must be below 150 kilobytes.
Include your uploaded image URL at below highlighted codes:-

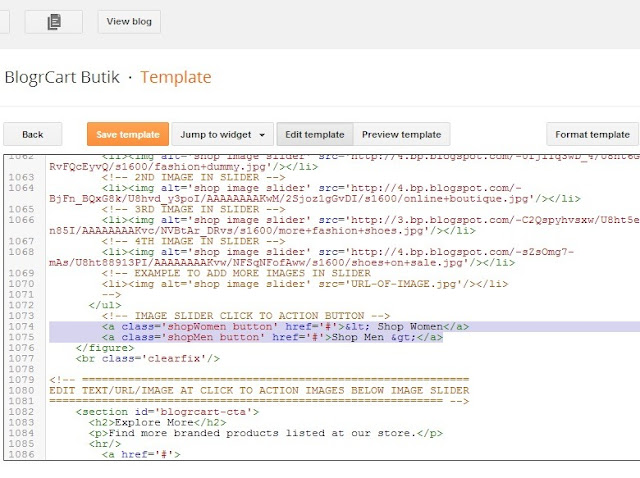
Edit the click to action button for the image slider at below codes. An example code for the buttons is located below the screenshot.

<a class='shopWomen' href='INSERT-URL-HERE'>EDIT-TEXT-TO-DISPLAY-HERE</a>

<a class='shopMen' href='INSERT-URL-HERE'>EDIT-TEXT-TO-DISPLAY-HERE</a>
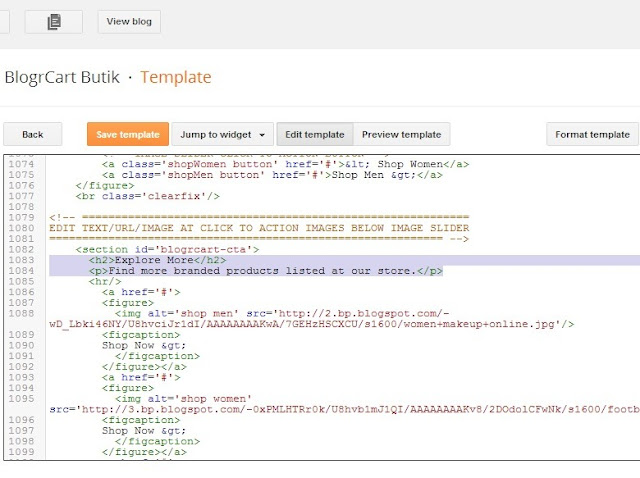
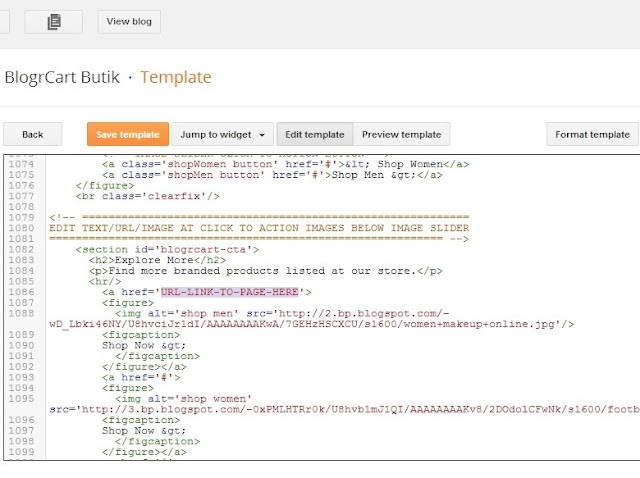
Homepage Click To Action Image Info
Edit the Headings & paragraphs for the Click to Action sections at Homepage (below responsive image slider). Screen shot below would be your reference. Each click to action section is contained by an <figure>...</figure> tag.
Edit the Click to Action heading title and paragraphs at below codes:-

Insert your click to action uploaded image at below codes. Preferred image ia 900pixels in width and 600pixels in height at 4:3 image ratio. Each image file size must be below 150kb.
Edit the click to action URL at below codes.

Here is an example of the click to action format to include the URL link.
<a href='YOUR-PAGE-LINK-TO-URL'>Shop Now</a>
Homepage Info Section Text
Edit the Headings & paragraphs for the Homepage Info section texts at below codes:-Each Homepage Info section starts at <article> and ends with </article>
Edit the Info Section headings per <article> here:-

Edit the Info Section paragraphs per <article> here:-
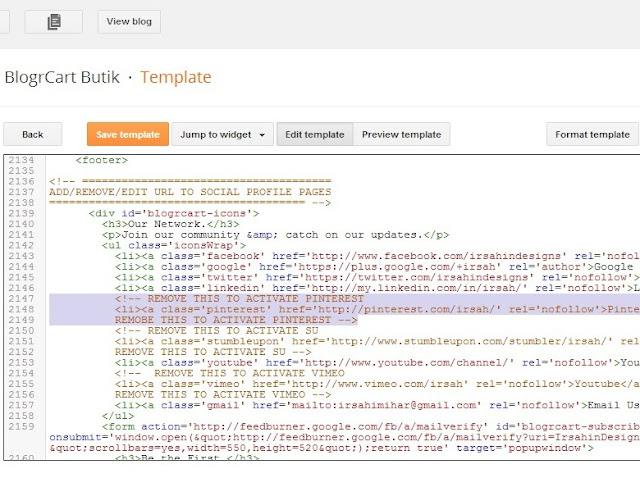
Social Bookmarks & Icons Settings
Customise the URL to your social profile page at below areas:-
Edit at the highlighted code or change the URL's to your social profile page.
Subscribe via Email
The initial subscribe via email is powered by Google's owned Feed burner. In order to use this plug-in, create a free account with Google Feed burner and follow the easy instructions to activate your email subscribers list. Insert your subscribe via email codes here using Goggle Feed burner credentials..We have also simplified the codes given by Google feed burner so users can easily include the required Feed burner account name in the codes itself. Below is the example codes:-
<form id='blogrcart-subscribe' action='http://feedburner.google.com/fb/a/mailverify' method='post' onsubmit='window.open("http://feedburner.google.com/fb/a/mailverify?uri=YOUR-FEED-NAME","popupwindow", "scrollbars=yes,width=550,height=520");return true' target='popupwindow'> <h3>Be the First.</h3> <p>Always the 1st to grab what's new at our store.</p> <input name='email' type='email'/> <input type='submit' name='submit' value='Subscribe' /> <input name='uri' type='hidden' value='YOUR-FEED-NAME' /> <input name='loc' type='hidden' value='en_US' /> </form>
Include your blog feed name registered at Feedburner at the code here " YOUR-FEED-NAME "
Custom Links at Footer Widgets
Below is an example how a footer would display best for your widget. Go to Layout > find footer widgets > click edit and insert below codes as reference:-
Insert your preferred URL at highlighted codes above.
Example of the footer links would look like so:-
<ul class='footer-links'>
    <li><a href='#'>Terms</a>
  </li>
    <li><a href='#'>Policy</a>
  </li>
   <li><a href='http://your-blog-page-to-link'>Agreement</a>
  </li>
    <li><a href='#'>Conditions</a>
  </li>
    <li><a href='#'>Software</a>
  </li>
    <li><a href='#'>Application</a>
  </li>
</ul>
Insert Header Image using Blogger Widget
You can easily replace the default Header text with an image by using the default Header widget functions. Head over to any page at your Blogger store and at the Header "Pencil" icon, click to open the pop up functions:-Select an image (preferable 1600pixels X 250pixels at below 100kb in image file size) > choose "Instead as Title and Description" > click Save to upload the Header image.
FAQ's
Q - Why when I click the "Send Order" button in the cart slide down it goes to a Page Not Found?A - Please check that your Send Order page URL matches the ones in Step 5: "Drop Down View Cart Buttons & Url's".
Q - Hey! When I tried to click the send order button, It's diverts to Paypal. Why?
A - By default the shopping cart is workable and functional via the pre-sets included upon template install. Normally there can be 2 instances which could cause the errors:-
- Error in your customisations - This includes missing commas, missing colons, typo errors & not following the initial format given in template codes.
- You did not update Step No 6.1 "Insert Ref: Send Order URL". Expand <b:includable id='main'> by clicking the black triangle and insert the FULL URL to your send order page here.
Q - Owh! Now when I click the Send Order at my checkout form button it goes to a Page Not Found. Why?
A - One or more settings in your "cart-email" did not follow the initial format provided. Normally the " http:// " protocol is included in the URL at your blog address, success page & error page. Remove the " http:// " and it will be working again.
Q - Why don't you guys build a Blogger widget for this template?
A - Good question! But we want you to familiarize with the codes & the shopping cart plug-in for Blogger templates. The plug-in itself is so versatile & by including simple line of codes, the plug-in can do what e-commerce store do! We want you to take full control on what can be displayed or not at your Blogger store via your own customizations. This way you are in full control, not dependable on an e-commerce shopping cart plug-in/widget. You can easily adapt/incorporate the functionality at your own Blogger template designed/builds too!
Got It!
Data submitted via comments collected & stored by the respective providers.
Read our Privacy Policy to learn more on data management & protection.